SpringMVC学习笔记 SpringMVC入门案例 TomCat 的作用 (1) 先搞懂核心定位(通俗比喻) 把整个 Web 应用比作 “餐厅”
浏览器 = 顾客(发起点餐请求);Tomcat = 餐厅的「前台 + 传菜员 + 机房」:负责接待顾客、解析点餐需求、把需求传给后厨,再把做好的餐品送回顾客;SpringMVC = 餐厅的「后厨(控制器 / 服务 / DAO)」:负责处理具体的 “点餐需求”(业务逻辑),但后厨不能直接面对顾客,必须通过前台(Tomcat)衔接。
(2) Tomcat 在 SpringMVC 中的核心作用 Tomcat 首先是一个轻量级 Web 服务器 ,负责处理最底层的网络通信:
监听指定端口(默认 8080),接收浏览器发来的 HTTP 请求(比如 GET/POST);
解析 HTTP 请求的格式(比如请求头、请求参数、请求体),把杂乱的 HTTP 字节流转换成 Java 能识别的对象 ——HttpServletRequest(请求对象)和HttpServletResponse(响应对象);
处理完请求后,把 SpringMVC 返回的响应数据(比如页面、JSON)重新封装成 HTTP 格式,发送回浏览器。
代码实现 (1) 创建配置类 1 2 3 4 @Configuration @ComponentScan("com.itheima.controller") public class SpringMvcConfig {}
(2) 创建Controller类 1 2 3 4 5 6 7 8 @Controller public class UserController { @RequestMapping("/save") public void save () { System.out.println("user save ..." ); } }
(3) 使用配置类替换web.xml 将web.xml删除,换成ServletContainersInitConfig
1 2 3 4 5 6 7 8 9 10 11 12 13 14 15 16 17 18 19 20 public class ServletContainersInitConfig extends AbstractDispatcherServletInitializer { protected WebApplicationContext createServletApplicationContext () { AnnotationConfigWebApplicationContext ctx = new AnnotationConfigWebApplicationContext (); ctx.register(SpringMvcConfig.class); return ctx; } protected String[] getServletMappings() { return new String []{"/" }; } protected WebApplicationContext createRootApplicationContext () { return null ; } }
核心逻辑:
① createServletApplicationContext ():创建 SpringMVC 专属的 IOC 容器
作用 :创建并返回一个Spring MVC 专属的 Web 应用上下文 (IOC 容器)。这个上下文专门用来加载 Spring MVC 相关的 Bean,比如控制器(@Controller)、视图解析器、处理器映射等。
AnnotationConfigWebApplicationContext 表示这个容器是基于Java 注解 来配置的,而不是 XML。
② getServletMappings ():指定 SpringMVC 处理哪些请求
作用 :指定 DispatcherServlet 要处理哪些 URL 请求。返回 "/" 意味着它会处理所有进入应用的请求。
bean加载控制 (1) 思路分析 加载Spring控制的bean的时候排除掉SpringMVC控制的bean,具体该如何排除
方式一:Spring加载的bean设定扫描范围为精准范围,例如service包、dao包等
方式二:Spring加载的bean设定扫描范围为com.itheima,排除掉controller包中的bean
(2) 代码实现 ① 方式一:修改Spring配置类,设定扫描范围为精准范围
1 2 3 4 @Configuration @ComponentScan({"com.itheima.service","comitheima.dao"}) public class SpringConfig {}
说明:
上述只是通过例子说明可以精确指定让Spring扫描对应的包结构,真正在做开发的时候,因为Dao最终是交给MapperScannerConfigurer对象来进行扫描处理的,我们只需要将其扫描到service包即可。
② 方式二:修改Spring配置类,设定扫描范围为com.itheima,排除掉controller包中的bean
1 2 3 4 5 6 7 8 9 @Configuration @ComponentScan(value="com.itheima", excludeFilters=@ComponentScan.Filter( type = FilterType.ANNOTATION, classes = Controller.class ) ) public class SpringConfig {}
excludeFilters属性:设置扫描加载bean时,排除的过滤规则
type属性:设置排除规则,当前使用按照bean定义时的注解类型进行排除
classes属性:设置排除的具体注解类,当前设置排除@Controller定义的bean
③ 测试类
1 2 3 4 5 6 public class App { public static void main (String[] args) { AnnotationConfigApplicationContext ctx = new AnnotationConfigApplicationContext (SpringConfig.class); System.out.println(ctx.getBean(UserController.class)); } }
1). 注意:
测试的时候,需要把SpringMvcConfig配置类上的@ComponentScan注解注释掉,否则不会报错。因为按照上述的要求,应该是SpringMvcConfig加载Controller,而现在注释掉了@ComponentScan,就会导致SpringMvcConfig无法指定Bean的扫描路径,导致Controller类无法被加载到IoC容器中。
2). 流程如下:
**如果不注释 SpringMvcConfig 上的 @ComponentScan:**Spring 容器加载 SpringConfig → 扫描到 SpringMvcConfig → 执行 SpringMvcConfig 的扫描 → Controller 被加载到根容器 → ctx.getBean(UserController.class) 能找到 Bean → 测试失败,看不到 “被排除” 的效果。
**如果注释掉 SpringMvcConfig 上的 @ComponentScan:**Spring 容器加载 SpringConfig → 扫描到 SpringMvcConfig,但它没有扫描动作 → Controller 没有被加载 → ctx.getBean(UserController.class) 抛出 NoSuchBeanDefinitionException → 测试成功,演示了 “被排除” 的效果。
(3) 代码优化 ServletContainerInitConfig
1 2 3 4 5 6 7 8 9 10 11 12 13 14 public class ServletContainersInitConfig extends AbstractAnnotationConfigDispatcherServletInitializer { protected Class<?>[] getRootConfigClasses() { return new Class []{SpringConfig.class}; } protected Class<?>[] getServletConfigClasses() { return new Class []{SpringMvcConfig.class}; } protected String[] getServletMappings() { return new String []{"/" }; } }
请求与响应 请求参数 (1) 参数传递 ① GET请求中文乱码
如果我们传递的参数中有中文,你会发现接收到的参数会出现中文乱码问题。
② 解决方案:配置过滤器
1 2 3 4 5 6 7 8 9 10 11 12 13 14 15 16 17 18 19 20 21 public class ServletContainersInitConfig extends AbstractAnnotationConfigDispatcherServletInitializer { protected Class<?>[] getRootConfigClasses() { return new Class [0 ]; } protected Class<?>[] getServletConfigClasses() { return new Class []{SpringMvcConfig.class}; } protected String[] getServletMappings() { return new String []{"/" }; } @Override protected Filter[] getServletFilters() { CharacterEncodingFilter filter = new CharacterEncodingFilter (); filter.setEncoding("UTF-8" ); return new Filter []{filter}; } }
getServletFilters()AbstractAnnotationConfigDispatcherServletInitializer 提供的扩展点,用来注册 Servlet 过滤器。CharacterEncodingFiltersetEncoding("UTF-8")
(2) 五种类型参数传递 ① 如果形参与地址参数名不一致该如何解决? 1). 发送请求与参数:
2). 解决方案:使用@RequestParam注解
1 2 3 4 5 6 7 @RequestMapping("/commonParamDifferentName") @ResponseBody public String commonParamDifferentName (@RequestPaam("name") String userName , int age) { System.out.println("普通参数传递 userName > " +userName); System.out.println("普通参数传递 age > " +age); return "{'module':'common param different name'}" ; }
② POJO数据类型 1). POJO参数:请求参数名与形参对象属性名相同,定义POJO类型形参即可接收参数
1 2 3 4 5 public class User { private String name; private int age; }
2). 后台接收参数:
1 2 3 4 5 6 7 @RequestMapping("/pojoParam") @ResponseBody public String pojoParam (User user) { System.out.println("pojo参数传递 user > " +user); return "{'module':'pojo param'}" ; }
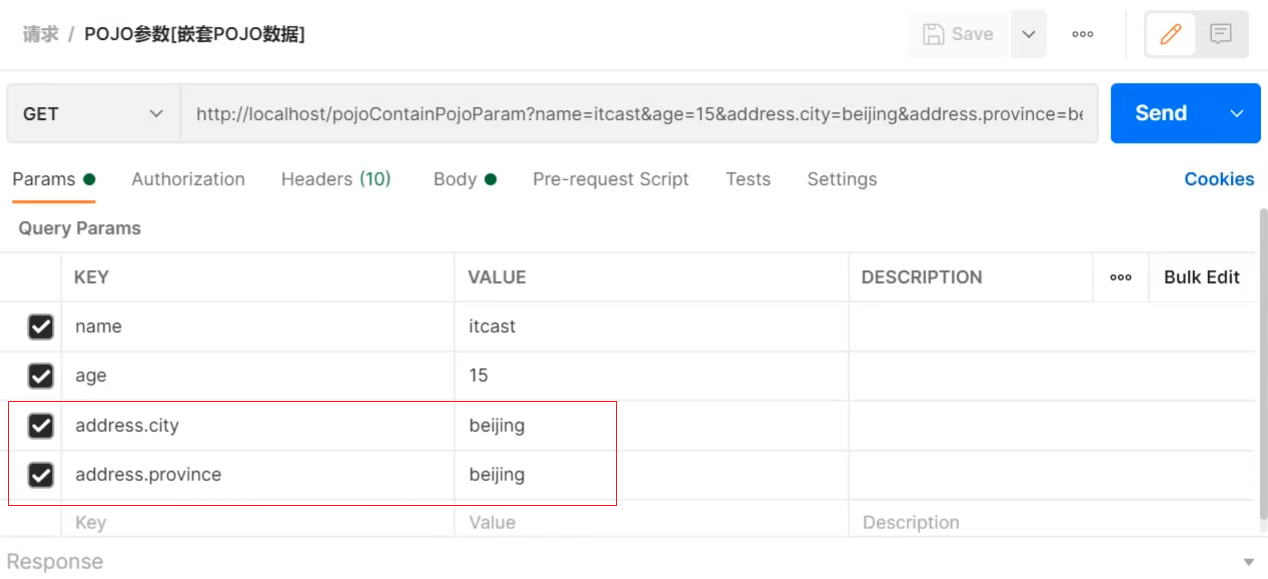
③ 嵌套POJO类型参数 1). 如果POJO对象中嵌套了其他的POJO类,如
1 2 3 4 5 6 7 8 9 10 11 public class Address { private String province; private String city; } public class User { private String name; private int age; private Address address; }
嵌套POJO参数:请求参数名与形参对象属性名相同,按照对象层次结构关系即可接收嵌套POJO属性参数
2). 发送请求和参数
④ 集合类型参数 1). 存在的问题
1 2 3 4 5 6 7 @RequestMapping("/listParam") @ResponseBody public String listParam (List<String> likes) { System.out.println("集合参数传递 likes > " + likes); return "{'module':'list param'}" ; }
错误的原因是:SpringMVC将List看做是一个POJO对象来处理,将其创建一个对象并准备把前端的数据封装到对象中,但是List是一个接口无法创建对象,所以报错。
2). 解决方案是使用@RequestParam注解
1 2 3 4 5 6 7 @RequestMapping("/listParam") @ResponseBody public String listParam (@RequestParam List<String> likes) { System.out.println("集合参数传递 likes > " + likes); return "{'module':'list param'}" ; }
集合保存普通参数:请求参数名与形参集合对象名相同且请求参数为多个,@RequestParam绑定参数关系
JSON数据传输参数 (1) JSON普通数组 ① 开启SpringMVC注解支持
在SpringMVC的配置类中开启SpringMVC的注解支持,这里面就包含了将JSON转换成对象的功能。
1 2 3 4 5 6 @Configuration @ComponentScan("com.itheima.controller") @EnableWebMvc public class SpringMvcConfig {}
② 参数前添加@RequestBody
1 2 3 4 5 6 7 @RequestMapping("/listParamForJson") @ResponseBody public String listParamForJson (@RequestBody List<String> likes) { System.out.println("list common(json)参数传递 list > " +likes); return "{'module':'list common for json param'}" ; }
(2) 知识点 ① @EnableWebMvc
名称
@EnableWebMvc
类型
配置类注解
位置
SpringMVC配置类定义上方
作用
开启SpringMVC多项辅助功能
② @RequestBody
名称
@RequestBody
类型
形参注解
位置
SpringMVC控制器方法形参定义前面
作用
将请求中请求体所包含的数据传递给请求参数,此注解一个处理器方法只能使用一次
日期类型参数传递 (1) 携带时间的日期 1 2 3 4 5 6 7 8 9 10 @RequestMapping("/dataParam") @ResponseBody public String dataParam (Date date, @DateTimeFormat(pattern="yyyy-MM-dd") Date date1, @DateTimeFormat(pattern="yyyy/MM/dd HH:mm:ss") Date date2) System.out.println("参数传递 date > " +date); System.out.println("参数传递 date1(yyyy-MM-dd) > " +date1); System.out.println("参数传递 date2(yyyy/MM/dd HH:mm:ss) > " +date2); return "{'module':'data param'}" ; }
(2) 知识点
名称
@DateTimeFormat
类型
形参注解
位置
SpringMVC控制器方法形参前面
作用
设定日期时间型数据格式
相关属性
pattern:指定日期时间格式字符串
响应 (1) 响应JSON数据 ① 响应POJO对象
1 2 3 4 5 6 7 8 9 10 11 12 13 14 @Controller public class UserController { @RequestMapping("/toJsonPOJO") @ResponseBody public User toJsonPOJO () { System.out.println("返回json对象数据" ); User user = new User (); user.setName("itcast" ); user.setAge(15 ); return user; } }
返回值为实体类对象,设置返回值为实体类类型,即可实现返回对应对象的json数据,需要依赖@ResponseBody注解和@EnableWebMvc注解
② 响应POJO集合对象
1 2 3 4 5 6 7 8 9 10 11 12 13 14 15 16 17 18 19 20 21 22 23 @Controller public class UserController { @RequestMapping("/toJsonList") @ResponseBody public List<User> toJsonList () { System.out.println("返回json集合数据" ); User user1 = new User (); user1.setName("传智播客" ); user1.setAge(15 ); User user2 = new User (); user2.setName("黑马程序员" ); user2.setAge(12 ); List<User> userList = new ArrayList <User>(); userList.add(user1); userList.add(user2); return userList; } }
(2) 知识点
名称
@ResponseBody
类型
方法\类注解
位置
SpringMVC控制器方法定义上方和控制类上
作用
设置当前控制器返回值作为响应体, 写在类上,该类的所有方法都有该注解功能
相关属性
pattern:指定日期时间格式字符串
说明:
当方法上有@ReponseBody注解后
方法的返回值为字符串,会将其作为文本内容直接响应给前端 方法的返回值为对象,会将对象转换成JSON响应给前端
Rest 风格 请求方式 按照不同的请求方式代表不同的操作类型:
发送GET请求是用来做查询
发送POST请求是用来做新增
发送PUT请求是用来做修改
发送DELETE请求是用来做删除
RESTful 快速开发 (1) 知识点 ① @PathVariable
名称
@PathVariable
类型
形参注解
位置
SpringMVC控制器方法形参定义前面
作用
绑定路径参数与处理器方法形参间的关系,要求路径参数名与形参名一一对应
② @RestController
名称
@RestController
类型
类注解
位置
基于SpringMVC的RESTful开发控制器类定义上方
作用
设置当前控制器类为RESTful风格, 等同于@Controller与@ResponseBody两个注解组合功能
③ @GetMapping @PostMapping @PutMapping @DeleteMapping
名称
@GetMapping @PostMapping @PutMapping @DeleteMapping
类型
方法注解
位置
基于SpringMVC的RESTful开发控制器方法定义上方
作用
设置当前控制器方法请求访问路径与请求动作,每种对应一个请求动作, 例如@GetMapping对应GET请求
相关属性
value(默认):请求访问路径
(2) 代码实现 1 2 3 4 5 6 7 8 9 10 11 12 13 14 15 16 17 18 19 20 21 22 23 24 25 26 27 28 29 30 31 32 33 34 35 36 37 38 39 40 @RestController @RequestMapping("/books") public class BookController { @PostMapping public String save (@RequestBody Book book) { System.out.println("book save..." + book); return "{'module':'book save'}" ; } @DeleteMapping("/{id}") public String delete (@PathVariable Integer id) { System.out.println("book delete..." + id); return "{'module':'book delete'}" ; } @PutMapping public String update (@RequestBody Book book) { System.out.println("book update..." + book); return "{'module':'book update'}" ; } @GetMapping("/{id}") public String getById (@PathVariable Integer id) { System.out.println("book getById..." + id); return "{'module':'book getById'}" ; } @GetMapping public String getAll () { System.out.println("book getAll..." ); return "{'module':'book getAll'}" ; } }
RESTful案例 (1) 代码实现 ① 编写Controller类并使用RESTful进行配置
1 2 3 4 5 6 7 8 9 10 11 12 13 14 15 16 17 18 19 20 21 22 23 24 25 26 27 28 29 30 31 32 33 34 35 36 37 @RestController @RequestMapping("/books") public class BookController { @PostMapping public String save (@RequestBody Book book) { System.out.println("book save > " + book); return "{'module':'book save success'}" ; } @GetMapping public List<Book> getAll () { System.out.println("book getAll is running ..." ); List<Book> bookList = new ArrayList <Book>(); Book book1 = new Book (); book1.setType("计算机" ); book1.setName("SpringMVC入门教程" ); book1.setDescription("小试牛刀" ); bookList.add(book1); Book book2 = new Book (); book2.setType("计算机" ); book2.setName("SpringMVC实战教程" ); book2.setDescription("一代宗师" ); bookList.add(book2); Book book3 = new Book (); book3.setType("计算机丛书" ); book3.setName("SpringMVC实战教程进阶" ); book3.setDescription("一代宗师呕心创作" ); bookList.add(book3); return bookList; } }
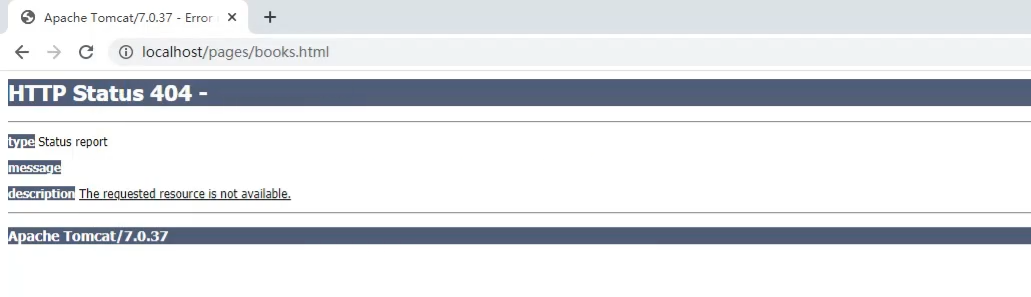
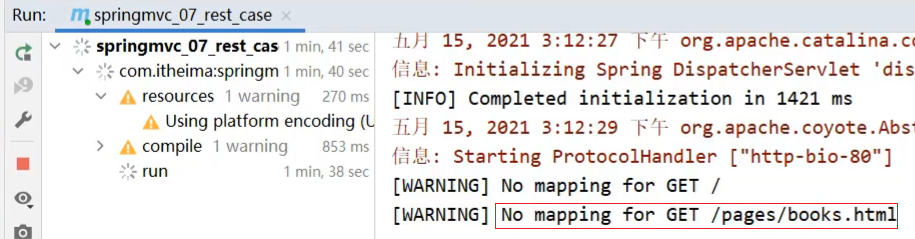
(2) 页面访问处理 ① 存在的问题 打开浏览器输入http://localhost/pages/books.html
② 解决方案 1). 出现错误的原因
2). 代码实现
1 2 3 4 5 6 7 8 9 10 11 12 @Configuration public class SpringMvcSupport extends WebMvcConfigurationSupport { @Override protected void addResourceHandlers (ResourceHandlerRegistry registry) { registry.addResourceHandler("/pages/**" ).addResourceLocations("/pages/" ); registry.addResourceHandler("/js/**" ).addResourceLocations("/js/" ); registry.addResourceHandler("/css/**" ).addResourceLocations("/css/" ); registry.addResourceHandler("/plugins/**" ).addResourceLocations("/plugins/" ); } }
该配置类是在config目录下,SpringMVC扫描的是controller包,所以该配置类还未生效,要想生效需要将SpringMvcConfig配置类进行修改
1 2 3 4 5 6 7 8 9 10 11 12 13 @Configuration @ComponentScan({"com.itheima.controller","com.itheima.config"}) @EnableWebMvc public class SpringMvcConfig {} 或者 @Configuration @ComponentScan("com.itheima") @EnableWebMvc public class SpringMvcConfig {}
1 2 3 4 5 6 7 8 9 10 11 12 13 14 15 16 saveBook () { axios.post("/books" ,this .formData).then((res)=>{ }); }, getAll() { axios.get("/books" ).then((res)=>{ this .dataList = res.data; }); }, } })
核心逻辑:
① axios.post("/books", this.formData)
用 POST 方法向后端的 /books 接口发送请求。
把表单数据 this.formData(比如用户输入的书名、作者、价格等)作为请求体发送给后端。
对应后端的 @PostMapping("/books") 接口,用于 “创建新资源”。
② this.dataList = res.data
请求成功后,后端会返回所有书籍的 JSON 数据(res.data)。
把这些数据赋值给前端的 dataList 数组,页面就会自动渲染出书籍列表。
SSM整合 整合配置 (1) 创建SpringConfig配置类 1 2 3 4 5 6 7 @Configuration @ComponentScan({"com.itheima.service"}) @PropertySource("classpath:jdbc.properties") @Import({JdbcConfig.class,MyBatisConfig.class}) @EnableTransactionManagement public class SpringConfig {}
(2) 创建JdbcConfig配置类 1 2 3 4 5 6 7 8 9 10 11 12 13 14 15 16 17 18 19 20 21 22 23 24 25 26 27 public class JdbcConfig { @Value("${jdbc.driver}") private String driver; @Value("${jdbc.url}") private String url; @Value("${jdbc.username}") private String username; @Value("${jdbc.password}") private String password; @Bean public DataSource dataSource () { DruidDataSource dataSource = new DruidDataSource (); dataSource.setDriverClassName(driver); dataSource.setUrl(url); dataSource.setUsername(username); dataSource.setPassword(password); return dataSource; } @Bean public PlatformTransactionManager transactionManager (DataSource dataSource) { DataSourceTransactionManager ds = new DataSourceTransactionManager (); ds.setDataSource(dataSource); return ds; } }
(3) 创建MybatisConfig配置类 1 2 3 4 5 6 7 8 9 10 11 12 13 14 15 16 public class MyBatisConfig { @Bean public SqlSessionFactoryBean sqlSessionFactory (DataSource dataSource) { SqlSessionFactoryBean factoryBean = new SqlSessionFactoryBean (); factoryBean.setDataSource(dataSource); factoryBean.setTypeAliasesPackage("com.itheima.domain" ); return factoryBean; } @Bean public MapperScannerConfigurer mapperScannerConfigurer () { MapperScannerConfigurer msc = new MapperScannerConfigurer (); msc.setBasePackage("com.itheima.dao" ); return msc; } }
(4) 创建JdbcConfig配置类 1 2 3 4 5 6 7 8 9 10 11 12 13 14 15 16 17 18 19 20 21 22 23 24 25 26 27 public class JdbcConfig { @Value("${jdbc.driver}") private String driver; @Value("${jdbc.url}") private String url; @Value("${jdbc.username}") private String username; @Value("${jdbc.password}") private String password; @Bean public DataSource dataSource () { DruidDataSource dataSource = new DruidDataSource (); dataSource.setDriverClassName(driver); dataSource.setUrl(url); dataSource.setUsername(username); dataSource.setPassword(password); return dataSource; } @Bean public PlatformTransactionManager transactionManager (DataSource dataSource) { DataSourceTransactionManager ds = new DataSourceTransactionManager (); ds.setDataSource(dataSource); return ds; } }
(5) 创建MybatisConfig配置类 1 2 3 4 5 6 7 8 9 10 11 12 13 14 15 16 public class MyBatisConfig { @Bean public SqlSessionFactoryBean sqlSessionFactory (DataSource dataSource) { SqlSessionFactoryBean factoryBean = new SqlSessionFactoryBean (); factoryBean.setDataSource(dataSource); factoryBean.setTypeAliasesPackage("com.itheima.domain" ); return factoryBean; } @Bean public MapperScannerConfigurer mapperScannerConfigurer () { MapperScannerConfigurer msc = new MapperScannerConfigurer (); msc.setBasePackage("com.itheima.dao" ); return msc; } }
(6) 创建SpringMVC配置类 1 2 3 4 5 @Configuration @ComponentScan("com.itheima.controller") @EnableWebMvc public class SpringMvcConfig {}
(7) 创建Web项目入口配置类 1 2 3 4 5 6 7 8 9 10 11 12 13 14 15 16 17 18 19 20 21 public class ServletConfig extends AbstractAnnotationConfigDispatcherServletInitializer { protected Class<?>[] getRootConfigClasses() { return new Class []{SpringConfig.class}; } protected Class<?>[] getServletConfigClasses() { return new Class []{SpringMvcConfig.class}; } protected String[] getServletMappings() { return new String []{"/" }; } @Override protected Filter[] getServletFilters() { CharacterEncodingFilter filter = new CharacterEncodingFilter (); filter.setEncoding("utf-8" ); return new Filter []{filter}; } }
功能模块开发 (1) 编写模型类 1 2 3 4 5 6 7 public class Book { private Integer id; private String type; private String name; private String description; }
(2) 编写Dao接口 1 2 3 4 5 6 7 8 9 10 11 12 13 14 15 16 17 18 public interface BookDao { @Insert("insert into tbl_book (type,name,description) values(#{type},#{name},#{description})") public void save (Book book) ; @Update("update tbl_book set type = #{type}, name = #{name}, description = #{description} where id = #{id}") public void update (Book book) ; @Delete("delete from tbl_book where id = #{id}") public void delete (Integer id) ; @Select("select * from tbl_book where id = #{id}") public Book getById (Integer id) ; @Select("select * from tbl_book") public List<Book> getAll () ; }
(3) 编写Service接口和实现类 Service接口
1 2 3 4 5 6 7 8 9 10 11 12 13 14 15 16 17 18 19 20 21 22 23 24 25 26 27 28 29 30 31 32 33 34 35 36 @Transactional public interface BookService { public boolean save (Book book) ; public boolean update (Book book) ; public boolean delete (Integer id) ; public Book getById (Integer id) ; public List<Book> getAll () ; }
Service实现类
1 2 3 4 5 6 7 8 9 10 11 12 13 14 15 16 17 18 19 20 21 22 23 24 25 26 27 28 @Service public class BookServiceImpl implements BookService { @Autowired private BookDao bookDao; public boolean save (Book book) { bookDao.save(book); return true ; } public boolean update (Book book) { bookDao.update(book); return true ; } public boolean delete (Integer id) { bookDao.delete(id); return true ; } public Book getById (Integer id) { return bookDao.getById(id); } public List<Book> getAll () { return bookDao.getAll(); } }
(4) 编写Contorller类 1 2 3 4 5 6 7 8 9 10 11 12 13 14 15 16 17 18 19 20 21 22 23 24 25 26 27 28 29 30 31 32 @RestController @RequestMapping("/books") public class BookController { @Autowired private BookService bookService; @PostMapping public boolean save (@RequestBody Book book) { return bookService.save(book); } @PutMapping public boolean update (@RequestBody Book book) { return bookService.update(book); } @DeleteMapping("/{id}") public boolean delete (@PathVariable Integer id) { return bookService.delete(id); } @GetMapping("/{id}") public Book getById (@PathVariable Integer id) { return bookService.getById(id); } @GetMapping public List<Book> getAll () { return bookService.getAll(); } }
单元测试 (1) 新建测试类 1 2 3 4 5 @RunWith(SpringJUnit4ClassRunner.class) @ContextConfiguration(classes = SpringConfig.class) public class BookServiceTest {}
(2) 注入Service类、编写测试方法 1 2 3 4 5 6 7 8 9 10 11 12 13 14 15 16 17 18 19 20 @RunWith(SpringJUnit4ClassRunner.class) @ContextConfiguration(classes = SpringConfig.class) public class BookServiceTest { @Autowired private BookService bookService; @Test public void testGetById () { Book book = bookService.getById(1 ); System.out.println(book); } @Test public void testGetAll () { List<Book> all = bookService.getAll(); System.out.println(all); } }
统一结果封装 设置统一数据返回结果类 1 2 3 4 5 public class Result { private Object data; private Integer code; private String msg; }
**注意:**Result类名及类中的字段并不是固定的,可以根据需要自行增减提供若干个构造方法,方便操作。
表现层与前端数据传输协议实现 (1) 创建Result类 1 2 3 4 5 6 7 8 9 10 11 12 13 14 15 16 17 18 19 20 21 22 23 public class Result { private Object data; private Integer code; private String msg; public Result () { } public Result (Integer code,Object data) { this .data = data; this .code = code; } public Result (Integer code, Object data, String msg) { this .data = data; this .code = code; this .msg = msg; } }
(2) 定义返回码Code类 1 2 3 4 5 6 7 8 9 10 11 12 public class Code { public static final Integer SAVE_OK = 20011 ; public static final Integer DELETE_OK = 20021 ; public static final Integer UPDATE_OK = 20031 ; public static final Integer GET_OK = 20041 ; public static final Integer SAVE_ERR = 20010 ; public static final Integer DELETE_ERR = 20020 ; public static final Integer UPDATE_ERR = 20030 ; public static final Integer GET_ERR = 20040 ; }
(3) 修改Controller类的返回值 1 2 3 4 5 6 7 8 9 10 11 12 13 14 15 16 17 18 19 20 21 22 23 24 25 26 27 28 29 30 31 32 33 34 35 36 37 38 39 40 41 42 @RestController @RequestMapping("/books") public class BookController { @Autowired private BookService bookService; @PostMapping public Result save (@RequestBody Book book) { boolean flag = bookService.save(book); return new Result (flag ? Code.SAVE_OK:Code.SAVE_ERR,flag); } @PutMapping public Result update (@RequestBody Book book) { boolean flag = bookService.update(book); return new Result (flag ? Code.UPDATE_OK:Code.UPDATE_ERR,flag); } @DeleteMapping("/{id}") public Result delete (@PathVariable Integer id) { boolean flag = bookService.delete(id); return new Result (flag ? Code.DELETE_OK:Code.DELETE_ERR,flag); } @GetMapping("/{id}") public Result getById (@PathVariable Integer id) { Book book = bookService.getById(id); Integer code = book != null ? Code.GET_OK : Code.GET_ERR; String msg = book != null ? "" : "数据查询失败,请重试!" ; return new Result (code,book,msg); } @GetMapping public Result getAll () { List<Book> bookList = bookService.getAll(); Integer code = bookList != null ? Code.GET_OK : Code.GET_ERR; String msg = bookList != null ? "" : "数据查询失败,请重试!" ; return new Result (code,bookList,msg); } }
核心逻辑:
① 如果 book 不为 null(查询成功):code = Code.GET_OK,msg = ""
② 如果 book 为 null(查询失败):code = Code.GET_ERR,msg = "数据查询失败,请重试!"
统一异常处理 异常处理器的使用 (1) 创建异常处理器类 1 2 3 4 5 6 7 8 9 10 @RestControllerAdvice public class ProjectExceptionAdvice { @ExceptionHandler(Exception.class) public Result doException (Exception ex) { System.out.println("嘿嘿,异常你哪里跑!" ) return new Result (666 ,null ,"嘿嘿,异常你哪里跑!" ); } }
(2) 知识点 ① @RestControllerAdvice
名称
@RestControllerAdvice
类型
类注解
位置
Rest风格开发的控制器增强类定义上方
作用
为Rest风格开发的控制器类做增强
② @ExceptionHandler
名称
@ExceptionHandler
类型
方法注解
位置
专用于异常处理的控制器方法上方
作用
设置指定异常的处理方案,功能等同于控制器方法,出现异常后终止原始控制器执行,并转入当前方法执行
项目异常处理方案 (1) 自定义异常类 1 2 3 4 5 6 7 8 9 10 11 12 13 14 15 16 17 18 19 20 21 22 23 24 25 26 27 28 29 30 31 32 33 34 35 36 37 38 39 40 41 42 43 44 45 46 47 public class SystemException extends RuntimeException { private Integer code; public Integer getCode () { return code; } public void setCode (Integer code) { this .code = code; } public SystemException (Integer code, String message) { super (message); this .code = code; } public SystemException (Integer code, String message, Throwable cause) { super (message, cause); this .code = code; } } public class BusinessException extends RuntimeException { private Integer code; public Integer getCode () { return code; } public void setCode (Integer code) { this .code = code; } public BusinessException (Integer code, String message) { super (message); this .code = code; } public BusinessException (Integer code, String message, Throwable cause) { super (message, cause); this .code = code; } }
说明:
让自定义异常类继承RuntimeException的好处是,后期在抛出这两个异常的时候,就不用在try…catch…或throws了
自定义异常类中添加code属性的原因是为了更好的区分异常是来自哪个业务的
(2) 将其他异常包定义成自定义异常 假如在BookServiceImpl的getById方法抛异常了,该如何来包装呢?
1 2 3 4 5 6 7 8 9 10 11 12 13 public Book getById (Integer id) { if (id == 1 ){ throw new BusinessException (Code.BUSINESS_ERR,"请不要使用你的技术挑战我的耐性!" ); } try { int i = 1 /0 ; }catch (Exception e){ throw new SystemException (Code.SYSTEM_TIMEOUT_ERR,"服务器访问超时,请重试!" ,e); } return bookDao.getById(id); }
(3) 处理器类中处理自定义异常 1 2 3 4 5 6 7 8 9 10 11 12 13 14 15 16 17 18 19 20 21 22 23 24 25 26 @RestControllerAdvice public class ProjectExceptionAdvice { @ExceptionHandler(SystemException.class) public Result doSystemException (SystemException ex) { return new Result (ex.getCode(),null ,ex.getMessage()); } @ExceptionHandler(BusinessException.class) public Result doBusinessException (BusinessException ex) { return new Result (ex.getCode(),null ,ex.getMessage()); } @ExceptionHandler(Exception.class) public Result doOtherException (Exception ex) { return new Result (Code.SYSTEM_UNKNOW_ERR,null ,"系统繁忙,请稍后再试!" ); } }
前后台协议联调 列表功能 1 2 3 4 5 6 getAll ( axios.get ("/books" ).then ((res )=> { this .dataList = res.data .data ; }); }
添加功能 (1) handleCreate打开新增面板 1 2 3 handleCreate() { this .dialogFormVisible = true ; },
(2) handleAdd方法发送异步请求并携带数据 1 2 3 4 5 6 7 8 handleAdd () { axios.post ("/books" ,this .formData ).then ((res )=> { this .dialogFormVisible = false ; this .getAll (); }); }
添加功能状态处理 ① 思路分析 新增成功是关闭面板,重新查询数据,那么新增失败以后该如何处理?
在handlerAdd方法中根据后台返回的数据来进行不同的处理
如果后台返回的是成功,则提示成功信息,并关闭面板
如果后台返回的是失败,则提示错误信息
② 代码实现 1). 修改前端页面
1 2 3 4 5 6 7 8 9 10 11 12 13 14 15 16 handleAdd () { axios.post("/books" ,this .formData).then((res)=>{ if (res.data.code == 20011 ){ this .dialogFormVisible = false ; this .$message.success("添加成功" ); }else if (res.data.code == 20010 ){ this .$message.error("添加失败" ); }else { this .$message.error(res.data.msg); } }).finally (()=>{ this .getAll(); }); }
2). 后台返回操作结果,将Dao层的增删改方法返回值从void改成int
1 2 3 4 5 6 7 8 9 10 11 12 13 14 15 16 17 public interface BookDao { @Insert("insert into tbl_book (type,name,description) values(#{type},#{name},#{description})") public int save (Book book) ; @Update("update tbl_book set type = #{type}, name = #{name}, description = #{description} where id = #{id}") public int update (Book book) ; @Delete("delete from tbl_book where id = #{id}") public int delete (Integer id) ; @Select("select * from tbl_book where id = #{id}") public Book getById (Integer id) ; @Select("select * from tbl_book") public List<Book> getAll () ; }
说明:
在使用 MyBatis 这类框架时,insert、update、delete 这类增删改操作 ,本质上是在修改数据库的数据。框架本身会自动统计这些操作影响了多少行数据 。
如果返回值是 void,上层代码(Service/Controller)就完全不知道这次数据库操作到底有没有真正执行成功,只能 “盲目相信” 它成功了。
如果返回值是 int,这个 int 就代表受影响的行数 。比如返回 1 表示成功新增 / 修改 / 删除了 1 条记录,返回 0 就表示没有任何数据被操作(比如要删除的 ID 不存在)。
3). 处理完新增后,会发现新增还存在一个问题,新增成功后,再次点击新增按钮会发现之前的数据还存在,这个时候就需要在新增的时候将表单内容清空。
1 2 3 4 5 6 7 resetForm ( this .formData = {}; } handleCreate ( this .dialogFormVisible = true ; this .resetForm (); }
修改功能 (1) 修改handleUpdate方法 1 2 3 4 5 6 7 8 9 10 11 12 13 14 handleUpdate (row ) { axios.get ("/books/" +row.id ).then ((res )=> { if (res.data .code == 20041 ){ this .formData = res.data .data ; this .dialogFormVisible4Edit = true ; }else { this .$message .error (res.data .msg ); } }); }
(2) 修改handleEdit方法 1 2 3 4 5 6 7 8 9 10 11 12 13 14 15 16 handleEdit ( axios.put ("/books" ,this .formData ).then ((res )=> { if (res.data .code == 20031 ){ this .dialogFormVisible4Edit = false ; this .$message .success ("修改成功" ); }else if (res.data .code == 20030 ){ this .$message .error ("修改失败" ); }else { this .$message .error (res.data .msg ); } }).finally (()=> { this .getAll (); }); }
删除功能 修改handleDelete方法
1 2 3 4 5 6 7 8 9 10 11 12 13 14 15 16 17 18 19 20 handleDelete (row ) { this .$confirm("此操作永久删除当前数据,是否继续?" ,"提示" ,{ type :'info' }).then (()=> { axios.delete ("/books/" +row.id ).then ((res )=> { if (res.data .code 20021 ){ this .$message .success ("删除成功" ); }else { this .$message .error ("删除失败" ); } }).finally (()=> { this .getAll (); }); }).catch (()=> { this .$message .info ("取消删除操作" ); }); }
说明:
① $confirm 的作用:
第 1 个参数:对话框的提示内容 ,这里是 “此操作将永久删除当前数据,是否继续?”
第 2 个参数:对话框的标题 ,这里是 “提示”
第 3 个参数:配置对象,type: 'info' 表示对话框的类型为 “信息提示”
② $message 的作用
它是前端页面的 “反馈工具”,当用户完成某个操作(比如删除、修改、新增)后,用简洁的弹窗告诉用户 “操作成功 / 失败 / 已取消”,提升交互体验,让用户明确知道自己的操作有没有生效。
1 2 3 4 5 6 7 8 9 10 11 12 13 14 15 16 17 18 this .$confirm("此操作将永久删除当前数据,是否继续?" , "提示" , { type : 'info' }).then (() => { axios.delete ("/books/" +row.id ).then (res => if (res.data .code === 20021 ) { this .$message .success ("删除成功" ); } else { this .$message .error ("删除失败" ); } }).finally (() => { this .getAll (); }); }).catch (() => { this .$message .info ("取消删除操作" ); });
拦截器 拦截器入门案例 (1) 创建拦截器类 让类实现HandlerInterceptor接口,重写接口中的三个方法。
1 2 3 4 5 6 7 8 9 10 11 12 13 14 15 16 17 18 19 20 21 22 23 @Component public class ProjectInterceptor implements HandlerInterceptor { @Override public boolean preHandle (HttpServletRequest request, HttpServletResponse response, Object handler) throws Exception { System.out.println("preHandle..." ); return true ; } @Override public void postHandle (HttpServletRequest request, HttpServletResponse response, Object handler, ModelAndView modelAndView) throws Exception { System.out.println("postHandle..." ); } @Override public void afterCompletion (HttpServletRequest request, HttpServletResponse response, Object handler, Exception ex) throws Exception { System.out.println("afterCompletion..." ); } }
**注意:**拦截器类要被SpringMVC容器扫描到。
(2) 配置拦截器类 1 2 3 4 5 6 7 8 9 10 11 12 13 14 15 16 @Configuration public class SpringMvcSupport extends WebMvcConfigurationSupport { @Autowired private ProjectInterceptor projectInterceptor; @Override protected void addResourceHandlers (ResourceHandlerRegistry registry) { registry.addResourceHandler("/pages/**" ).addResourceLocations("/pages/" ); } @Override protected void addInterceptors (InterceptorRegistry registry) { registry.addInterceptor(projectInterceptor).addPathPatterns("/books" ); } }
说明:
重写方法:配置静态资源映射
1 2 3 4 @Override protected void addResourceHandlers (ResourceHandlerRegistry registry) { registry.addResourceHandler("/pages/**" ).addResourceLocations("/pages/" ); }
这个方法的作用是:让 Spring MVC 能正确处理静态资源(HTML/CSS/JS/ 图片) 。
addResourceHandler("/pages/**"):定义 URL 规则,所有以 /pages/ 开头的请求,都当作静态资源请求处理。addResourceLocations("/pages/"):告诉 Spring,这些静态资源存放在服务器的 /pages/ 目录下
拦截器参数 (1) 前置处理方法 1 2 3 4 5 6 public boolean preHandle (HttpServletRequest request, HttpServletResponse response, Object handler) throws Exception { System.out.println("preHandle" ); return true ; }
request:请求对象
response:响应对象
handler:被调用的处理器对象,本质上是一个方法对象,对反射中的Method对象进行了再包装
使用request对象可以获取请求数据中的内容,如获取请求头的Content-Type
1 2 3 4 5 public boolean preHandle (HttpServletRequest request, HttpServletResponse response, Object handler) throws Exception { String contentType = request.getHeader("Content-Type" ); System.out.println("preHandle..." +contentType); return true ; }