SpringBoot简介
SpringBoot 快速入门
(1) 对比
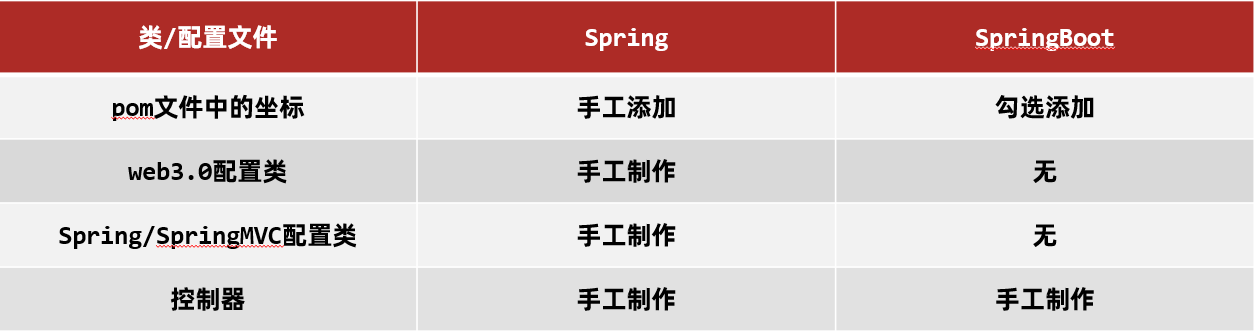
坐标
Spring 程序中的坐标需要自己编写,而且坐标非常多
SpringBoot 程序中的坐标是我们在创建工程时进行勾选自动生成的
web3.0配置类
Spring 程序需要自己编写这个配置类。这个配置类之前编写过,很复杂
SpringBoot 程序不需要我们自己书写
配置类
Spring/SpringMVC 程序的配置类需要自己书写。而 SpringBoot 程序则不需要书写。
配置文件
配置文件格式
(1) application.properties配置文件
(2) application.yml配置文件(推荐)
注意: 在:后,数据前一定要加空格。
(3) application.yaml配置文件
三种配合文件的优先级
1
| application.properties` > `application.yml` > `application.yaml
|
yaml 格式
(1) 语法规则
大小写敏感
属性层级关系使用多行描述,每行结尾使用冒号结束
使用缩进表示层级关系,同层级左侧对齐,只允许使用空格(不允许使用Tab键)
空格的个数并不重要,只要保证同层级的左侧对齐即可。
属性值前面添加空格(属性名与属性值之间使用冒号+空格作为分隔)
# 表示注释
(2) 数组数据在数据书写位置的下方使用减号作为数据开始符号,每行书写一个数据,减号与数据间空格分隔,例如:(了解即可)
1
2
3
4
5
6
7
8
| enterprise:
name: itcast
age: 16
tel: 4006184000
subject:
- Java
- 前端
- 大数据
|
yaml配置文件数据读取
(1) 使用 @Value注解
使用 @Value("表达式") 注解可以从配置文件中读取数据,注解中用于读取属性名引用方式是:${一级属性名.二级属性名……}
我们可以在 BookController 中使用 @Value 注解读取配置文件数据,如下
1
2
3
4
5
6
7
8
9
10
11
12
13
14
15
16
17
18
19
| @RestController
@RequestMapping("/books")
public class BookController {
@Value("${lesson}")
private String lesson;
@Value("${server.port}")
private Integer port;
@Value("${enterprise.subject[0]}")
private String subject_00;
@GetMapping("/{id}")
public String getById(@PathVariable Integer id){
System.out.println(lesson);
System.out.println(port);
System.out.println(subject_00);
return "hello , spring boot!";
}
}
|
(2) 自定义对象(常用)
① SpringBoot 还提供了将配置文件中的数据封装到我们自定义的实体类对象中的方式。具体操作如下:
将实体类 bean 的创建交给 Spring 管理。
在类上添加 @Component 注解
使用 @ConfigurationProperties 注解表示加载配置文件
在该注解中也可以使用 prefix 属性指定只加载指定前缀的数据
在 BookController 中进行注入
② 代码示例
Enterprise 实体类内容如下:
1
2
3
4
5
6
7
8
9
10
11
12
13
14
15
16
17
18
19
20
21
22
23
24
25
26
27
28
29
30
31
32
33
34
35
36
37
38
39
40
41
42
43
44
45
46
47
48
49
50
| @Component
@ConfigurationProperties(prefix = "enterprise")
public class Enterprise {
private String name;
private int age;
private String tel;
private String[] subject;
public String getName() {
return name;
}
public void setName(String name) {
this.name = name;
}
public int getAge() {
return age;
}
public void setAge(int age) {
this.age = age;
}
public String getTel() {
return tel;
}
public void setTel(String tel) {
this.tel = tel;
}
public String[] getSubject() {
return subject;
}
public void setSubject(String[] subject) {
this.subject = subject;
}
@Override
public String toString() {
return "Enterprise{" +
"name='" + name + '\'' +
", age=" + age +
", tel='" + tel + '\'' +
", subject=" + Arrays.toString(subject) +
'}';
}
}
|
多环境配置
(1) yaml文件
① 在 application.yml 中使用 --- 来分割不同的配置,内容如下:
1
2
3
4
5
6
7
8
9
10
11
12
13
14
15
16
17
18
| #开发
spring:
profiles: dev #给开发环境起的名字
server:
port: 80
---
#生产
spring:
profiles: pro #给生产环境起的名字
server:
	port: 81
---
#测试
spring:
profiles: test #给测试环境起的名字
server:
port: 82
---
|
② 上面配置中 spring.profiles 是用来给不同的配置起名字的。而如何告知 SpringBoot 使用哪段配置呢?可以使用如下配置来启用那一段配置
1
2
3
4
| #设置启用的环境
spring:
profiles:
active: dev #表示使用的是开发环境的配置
|
③ 综上所述,application.yml 配置文件内容如下
1
2
3
4
5
6
7
8
9
10
11
12
13
14
15
16
17
18
19
20
21
22
23
24
| #设置启用的环境
spring:
profiles:
active: dev
---
#开发
spring:
profiles: dev
server:
port: 80
---
#生产
spring:
profiles: pro
server:
port: 81
---
#测试
spring:
profiles: test
server:
port: 82
---
|
(2) 命令行启动参数设置
① 这种方式显然有点麻烦,而 SpringBoot 提供了在运行 jar 时设置开启指定的环境的方式,如下
1
| java –jar xxx.jar –-spring.profiles.active=test
|
② 这种方式也可以临时修改端口号,通过如下方式
1
| java –jar xxx.jar –-server.port=88
|
SpringBoot整合第三方技术
SpringBoot 整合 junit
(1) 在 com.itheima.service 下创建 BookService 接口,内容如下
1
2
3
| public interface BookService {
public void save();
}
|
(2) 在 com.itheima.service.impl 包写创建一个 BookServiceImpl 类,使其实现 BookService 接口,内容如下
1
2
3
4
5
6
7
| @Service
public class BookServiceImpl implements BookService {
@Override
public void save() {
System.out.println("book service is running ...");
}
}
|
(3) 在 test/java 下创建 com.itheima 包,在该包下创建测试类,将 BookService 注入到该测试类中
1
2
3
4
5
6
7
8
9
10
11
| @SpringBootTest
class Springboot07TestApplicationTests {
@Autowired
private BookService bookService;
@Test
public void save() {
bookService.save();
}
}
|
SpringBoot 整合 MyBatis
(1) 操作步骤
① 定义实体类
在 com.itheima.domain 包下定义实体类 Book,内容如下
1
2
3
4
5
6
7
8
9
10
| public class Book {
private Integer id;
private String name;
private String type;
private String description;
}
|
② 定义dao接口
在 com.itheima.dao 包下定义 BookDao 接口,内容如下
1
2
3
4
5
| @Mapper
public interface BookDao {
@Select("select * from tbl_book where id = #{id}")
public Book getById(Integer id);
}
|
说明:
1). 一定要加上 @Mapper,否则会显示在 Spring 容器中没有 BookDao 类型的 bean。
2). @Mapper 就是用来 “通知” MyBatis 的 ——给接口打上 @Mapper 注解,就告诉 MyBatis:“这是一个 DAO 接口,帮我生成代理实现类,交给 Spring 管理”。
③ 定义测试类
在 test/java 下定义包 com.itheima ,在该包下测试类,内容如下
1
2
3
4
5
6
7
8
9
10
11
12
| @SpringBootTest
class Springboot08MybatisApplicationTests {
@Autowired
private BookDao bookDao;
@Test
void testGetById() {
Book book = bookDao.getById(1);
System.out.println(book);
}
}
|
案例
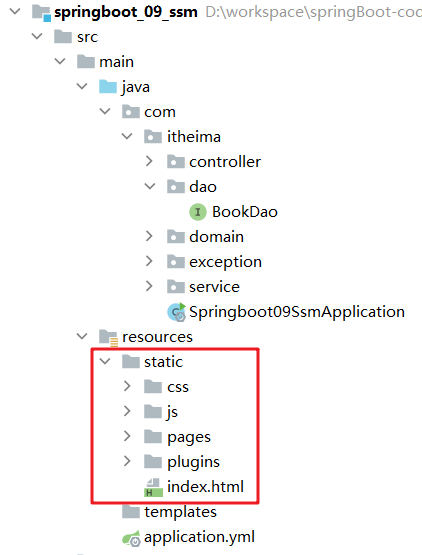
静态资源
在 SpringBoot 程序中是没有 webapp 目录的,那么在 SpringBoot 程序中静态资源需要放在什么位置呢?
静态资源需要放在 resources 下的 static 下,如下图所示